Making improvements
This page provides guidance on how to go about making an improvement and solving your problem. Making an improvement involves identifying problems in your current practice, generating ideas for improvements and performing Plan Do Study Act (PDSA) cycles using improvement science.
Improvement science refers to the methodology, tools and processes commonly used in healthcare to improve safety and quality structures, processes and outcomes.
If you are new to improvement science or would like to refresh your knowledge, visit the CEC Academy to access a wide range of tools and resources to support your improvement journey.
You can also contact your Clinical Governance or Patient Safety Unit who can connect you with your local quality improvement experts.
The Suicide Prevention Quality Improvement Framework follows the Model for Improvement and Improvement Science and provides overall guidance on conducting a quality improvement project.
The Zero Suicides in Care Framework is designed to enable mental health services and health systems to reduce the suicide rate of people who come into those services. It focuses not on the general population, but on the people who come into our care. In summary the main components of the ZSiC Framework are:
- Leadership committed to the development of safety culture and system improvement capability
- A structured preventive care pathway offered to everyone for whom there is a concern about suicidal behaviour. The SPP has a number of essential elements.
- A continuous commitment to system improvement driven by data. Data provides information about the effectiveness of the SPP (safety intelligence). Data informs us if a change has resulted in improvement. Data is used for improvement not for judgement
- The framework is supported by a Safety culture that is characterised by support and psychological safety for everybody, learning, and restorative justice. A restorative justice culture recognises a forward-looking accountability:
- To respond to the needs of patients, families as primary victims, and staff who are commonly 'second victims'
- To learn from data and incidents
- To improve the systems and practices of care.
What is your improvement project aiming to achieve?
The aim statement captures the goal of the project and is the answer to the first question in the Model for Improvement 'What are we trying to accomplish?' The aim statement must address the problem and must not include any solutions.
The project's aim must be:
Tips:
- Remember, 'some' or 'better' is not a measure and 'soon' is not a time frame.
- Start small and focus on an individual unit or ward (even if the problem may be more widespread). This will allow you to refine the new processes, demonstrate their impact on practices and outcomes, and build increased support with stakeholders. Then you can consider spreading the initiative to other parts of your service.
- Avoid aim statements that suggest the desired solution to the problem e.g. to implement a specific policy or process on your ward.
Examples of aim statement include:
- Within 12 months, reduce to zero intentional self-harm readmissions within 28 days to Mental Health Service, who have been placed on a suicide prevention pathway.
- Within 6 months, 100% of consumers, 12 - 24 years, who are identified to have suicidal behaviour will receive a formulative suicide prevention assessment and referral to the suicide prevention pathway.
- Within 9 months, increase 50% of suicide and self-harm risk assessments for mental health consumers over 60 years.
- Within 12 months, improve access to wellbeing services among all Aboriginal and Torres Strait Islander males within xx community mental health services.
- Within 12 months, reduce to zero suicide deaths within the inpatient mental health unit.
What is your current Suicide Prevention practice?
It is important to review and understand your current practice to help identify problems or gaps.
Develop a flow chart (a process map) of your current suicide prevention practices. Your flow chart is a diagram which should show each step and decision point related to suicide care, from the time a consumer enters emergency department or your unit/ service, until they are discharged/ referred.
The flow chart provides a helicopter view of how the current process happens, rather than what it should be, identifying all the points of decision-making and variation. Creating a flow chart will help the project team to:
- Visualise the entire suicide prevention process as it currently is
- Consider the current roles and responsibilities of each member of the team (e.g. ED or admitting medical officer, nursing, allied health, peer support worker, carer/ family member etc) involved in the care of the consumer
- Identify critical points, gaps, patient journeys, decision points, variations in practice, bottlenecks and opportunities for improvement
- Highlight area of the process that have not originally been considered or are not well understood by the team
- Identify areas where data may need to be collected to demonstrate the current reliability of each step of process (that is, how often the process actually occurs as planned in practice) e.g. documentation of risk assessment, brief intervention, individualised care plan, access to lethal means, consumer and carer education.
More information on flowcharts and how to construct them can be found on Quality Improvement Tools – Flow Chart.
View an example flowchart relating to suicide prevention.
Referring to your flowchart, you will have identified potential gaps and issues with your current process for suicide prevention. The next step is brainstorming the possible causes as to why your problem exists - Find more information on brainstorming and the 5Ws and 1H method.
Brainstorming as a team will give you a better understanding of the problem you are aiming to solve. Without understanding all the possible causes of a problem, the solutions you generate may not actually lead to an improvement because they are focused on the wrong part of the process, allowing the problem to continue.
It is important that you identify specific causes. Here are some brainstorming examples for potential problems faced in the Mental Health Inpatient setting.
Problem: "Why did consumers, who were on a suicide care pathway, represent to Emergency Department within 28 days of discharge with deliberated self-harm and/or suicide behaviours?"
How do you make sense of the problems identified?
It is essential to make meaningful sense of causes and contributing factors you have identified to plan for the next stage of the improvement project. It is highly recommended that this process occurs with your team and quality improvement advisor or mental health improvement coach present.
An affinity diagram involves sorting all the identified causes and factors contributing to the problem from the brainstorming process, into categories or themes. More information on how to create an affinity diagram can be found here.
Example of Suicide Prevention Affinity Diagram.
A Driver Diagram is an extension of the Affinity Diagram. It is a visual tool that illustrates the relationship between the aim of the improvement project, the primary drivers (category headings) and the secondary drivers (contributing factors and causes of the problem). The driver diagram is your project plan on a page.
Primary drivers are high-level factors that need to be influenced in order to achieve the aim. Secondary drivers are specific factors or interventions that are necessary to achieve the primary drivers. Each secondary driver will contribute to at least one primary driver, shown via relationship arrows. Information on how to create a driver diagram can be found here.
Example of Suicide Prevention Driver Diagram.
What are change ideas or change concepts?
Solutions in quality improvement are commonly referred to as change ideas or change concepts. Change ideas are interventions to address the secondary drivers and aim statement. Change ideas describe what you are going to do to achieve your aim.
As a team, use the Driver Diagram to brainstorm solutions for each secondary driver. Brainstorming change ideas is the answer to the third question in the Model for Improvement 'What change can we make that will result in improvement?'. It is possible that a solution will address more than one secondary driver. It is important to note all improvement requires change, but not all changes lead to improvement.
See Suicide Prevention Driver Diagram example complete with change ideas.
It is not realistic or recommended to test several change ideas at once - if improvement occurs, how will you know which change idea or combination of change ideas led to the improvement? Prioritising change ideas can assist with deciding which change ideas to test first.
For each change idea, consider:
- Will it be easy or hard to implement? (consider the cost involved, time involved, extent of training required)
- What impact will it have on achieving the aim?
- Consider the feasibility, time requirements, how the change will be done (that is, the logistics) and the expected outcomes of each change idea.
Just because a change idea may be considered hard to implement does not mean it should be a low priority. Some of the hardest changes may be the most important ones to test and lead to the biggest improvement.
See Suicide Prevention Quality Improvement Framework prioritisation matrix as a guidance.
How do you test change ideas through PDSA cycles?
To determine if your change idea has led to an improvement, you should conduct quick, small-scale tests called Plan, Do, Study, Act (PDSA) cycles.
PDSA cycle tests start on a very small scale (for example, testing a change on 1 patient or 1 shift or with 1 team) so you can test safely. If the first test leads to the predicted effect, the next test can be slightly larger (for example, testing on 3 patients, 3 shifts or 3 teams) and once there is more data and confidence in the change, increase the test size again (for example, to 5 units).
Small tests of a change often lead to minor improvements or adjustments for the next PDSA cycle of a change idea. It is an iterative, action learning process. You can watch this short video to see PDSA cycles in action.
Once you have the data and confidence from these tests, the change can be rolled out and reviewed until the team can see a reliable improvement. The benefit of this is if the change doesn't achieve the desired or expected results, you can quickly move on without having spent a huge amount of time on it or implemented it broadly.
PDSA cycles are designed to be performed rapidly and sequentially. Implementation of a change, which takes substantial time and effort, only occurs if the test of change (which starts small and gradually increases) achieve a reliable improvement. PDSA cycles are the practical, real-life part of the Model for Improvement.
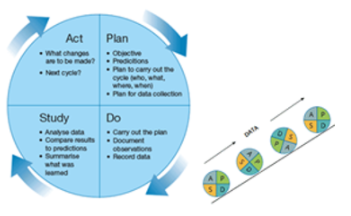
You must work through each of the four stages of a PDSA cycle:
- Plan – the change (who, what, when, where and how) and make predictions about the outcome.
- Do – carry out the plan, observe and measure (that is, collect data) what happens. Take notes of what went well and what didn’t.
- Study – analyse and compare data, summarise learnings.
- Act – decide on what will be abandoned, modified or tested in a larger way for the next PDSA test using the results from the study phase.
More information on PDSA cycles can be found here.
- Test no more than three change ideas at a time
- Consider testing the next change idea when you are confident in the first change idea (that is, starting to scale up the testing)
- Monitor the data and measures to track improvements (refer to Data for Improvement)
- Determine which changes (or combination of change ideas) are leading to an improvement and achieving the aim
- PDSA cycles are not designed to be time consuming, and can be performed rapidly and in a staggered approach
- Briefly document each PDSA cycle to help understand the process and ensure all four stages are followed.