Making improvements
This page provides guidance on identifying problems in your current practice, generating ideas for improvements and performing Plan Do Study Act (PDSA) cycles using improvement science.
Improvement science refers to methodology, tools and processes commonly used in health care to improve safety and quality structures, processes and outcomes.
If you are new to improvement science or would like to refresh your knowledge, visit the CEC Academy website to access a wide range of tools and resources to support your quality improvement (QI). You can also contact your Clinical Governance or Patient Safety Unit, who may be able to connect you with local QI Advisors. The CEC Academy or Medication Safety team can also be contacted directly with any questions you may have.
Remember the following steps of improvement methodology serve as a guide to conducting your own project. You are free to adapt the methodology to suit you and your team.
What is your project aiming to achieve?
Once you have established the local problem you want to solve and the contributing causes, a project aim should be created.
The order of the improvement methodology steps is interchangeable. If you already have an aim statement, this is a good time to check that it is a SMART aim.
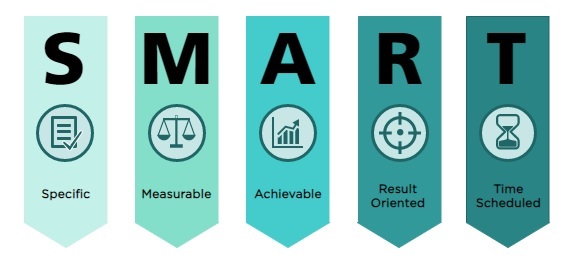
The project's aim must be:
Tips:
- Remember, 'some' or 'better' is not a measure and 'soon' is not a time frame.
- Start small and focus on an individual unit or ward (even if the problem may be more widespread). This will allow you to refine the new processes, demonstrate their impact on practices and outcomes, and build increased support with stakeholders. Then you can consider spreading the initiative to other parts of your service.
- Avoid aim statements that suggest the desired solution to the problem, e.g. to implement the Med Rec policy at your unit/ward.
- "Within x months, 85 % of [insert type] patients at [insert ward/unit] will have [BPMH/admission] medication reconciliation completed within x hours of stay."
- "By x month, x year, 90 % of [insert type] patients at [insert ward/unit] will have [discharge] medication reconciliation completed prior to discharge."
Aim Statement example |
What is your current Med Rec practice?
It is important to review and understand your current practice to help identify problems or gaps.
Develop a flowchart of your current clinical practices with your team. Remember to:
- Visualise the entire Med Rec process as it currently is (that is, what happens currently, not what should happen)
- Consider the current roles and responsibilities of each member involved in the process
- Identify time critical points, gaps, variations in practice, bottlenecks and opportunities for improvement.
Remember to chart what actually happens instead of what should happen.
Use the mapping guide to assist with this task.
Flow Chart example |
Once the flowchart has been agreed upon, the team should analyse the process map. Compared to the ideal process*, consider how your Med Rec practice can be improved. Questions to ask include Questions to ask include:
- What are the things that can go wrong within each step?
- How much error correction/re-work is being carried out?
- Are we doing the right things in the process?
- Are we doing things in the right order?
- Are the right/best people doing it?
- Is the process producing the results we want?
- Is the process cost and time effective?
- Identify areas you need data to gain a better understanding of the process and its current reliability. Visit the Med Rec toolkit 'Getting Started' page for further information.
*Visit the Med Rec website for best practice processes. You will find the definition of Med Rec, guide for determining roles and responsibilities and local operating procedure in this link.
Once you have identified potential gaps with sufficient baseline data and supporting information, the next step is to brainstorm the reasons they exist. Without fully understanding all of the causes of a problem, solutions may not actually lead to an improvement because they could be focused on the wrong part of the process, allowing the problem to continue.
Referring to your flowchart, you will have identified the potential gaps and issues with the current process and the next step is brainstorming all the reasons they exist. Use the 5Ws and 1H method to brainstorm.
Brainstorming will give you a better understanding of the problem you are aiming to solve.
When brainstorming, it is important the causes are specific. For example, rather than "medication history not taken on admission", be more specific such as
Med Rec Brainstorm example

How do you make sense of the problems identified?
It is essential to make meaningful sense of the causes of the problems you have identified to plan for the next stage of the improvement project. It is highly recommended that this process occurs with your team and quality improvement advisor present.
An Affinity Diagram involves sorting all the identified causes of the problem from the brainstorming process into categories or themes. Visit the CEC QI Academy website on how to create an affinity diagram.
Med Red Affinity Diagram example

Affinity Diagram example |
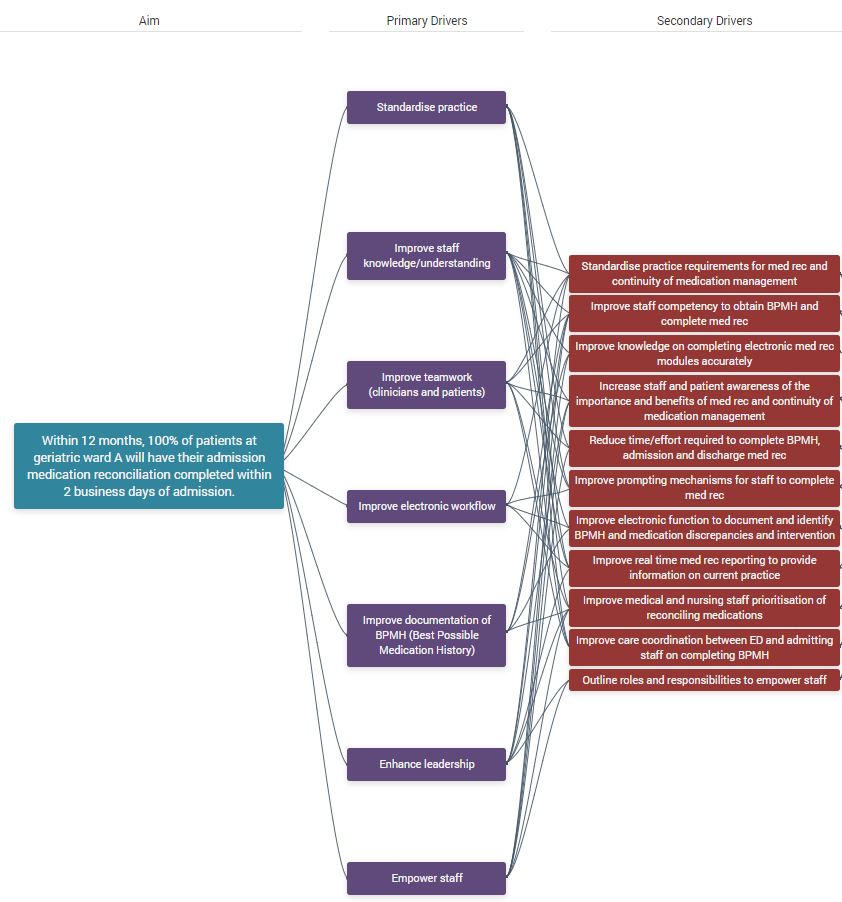
A Driver Diagram is an extension of an affinity diagram. It is a visual tool that illustrates the relationship between the aim of the improvement project, the primary drivers (category headings) and the secondary drivers (causes of the problem). Visit the CEC QI Academy website on how to create a driver diagram.
- Primary drivers are high-level factors that need to be influenced in order to achieve the aim.
- Secondary drivers are specific factors or interventions that are necessary to achieve the primary drivers. Each secondary driver will contribute to at least one primary driver, shown via relationship arrows.
Med Rec Driver Diagram Example
Driver Diagram example |
What are change ideas or change concepts?
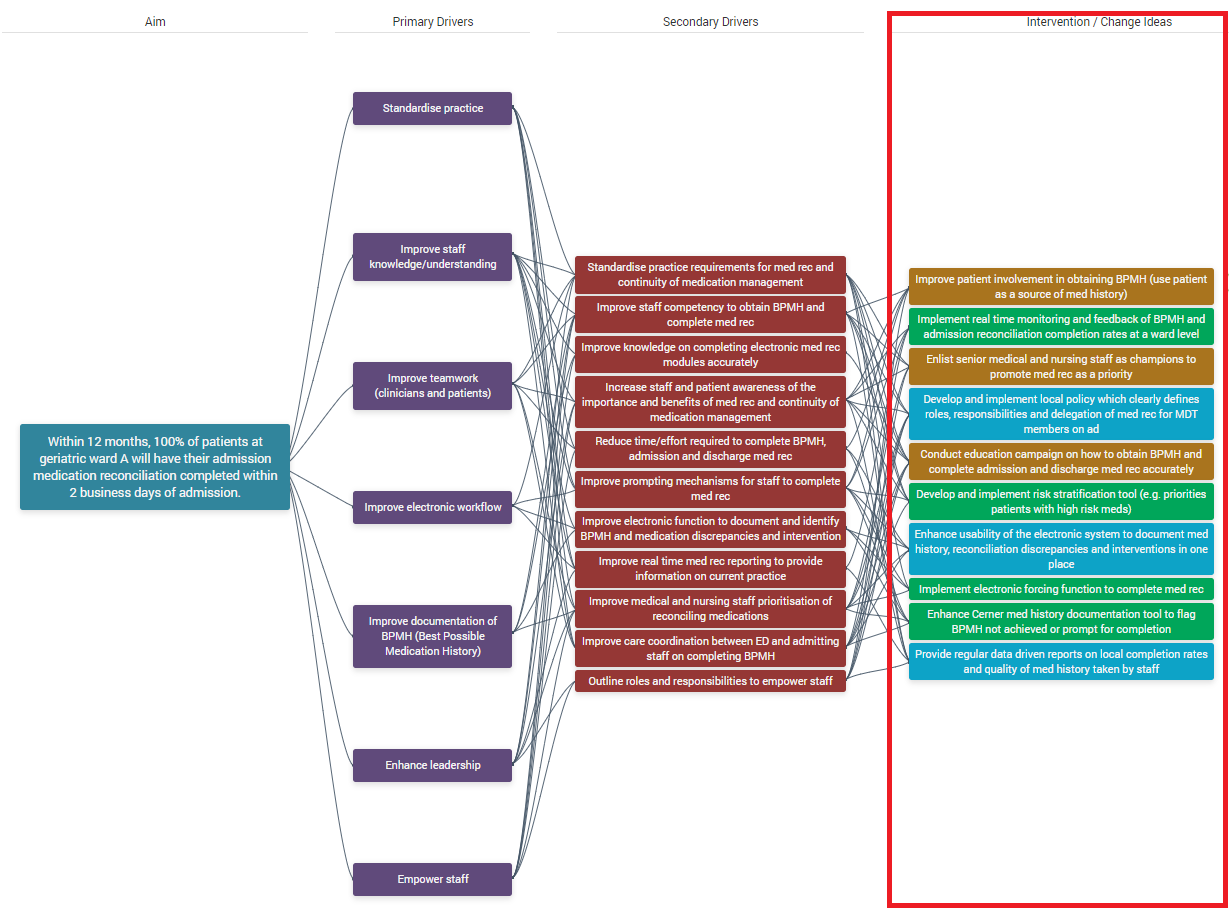
Solutions in quality improvement are commonly referred to as change ideas or change concepts. They are well defined ideas, concepts or interventions to address the secondary drivers - that is, what exactly you are going to do and how this will be achieved.
As a team, use the Driver Diagram to brainstorm solutions for each secondary driver. It is possible that a solution will address more than one secondary driver.
It is important to note all improvement requires change but not all changes lead to improvement.
Med Rec Change Ideas Example (illustrated via a Driver Diagram)
Change ideas example |
Prioritising change ideas can help with deciding which ones to focus on first.
For each change idea, consider:
- Will it be easy or hard to implement? (consider the cost involved, time involved, extent of training required)
- What impact will it have on achieving the aim?
- Consider the feasibility, time requirements, how the change will be done (that is, the logistics) and the expected outcomes of each change idea.
Just because a change idea may be considered hard to implement does not mean it should be a low priority. Some of the hardest changes may be the most important ones to test and may lead to the biggest improvement.
Use this template to prioritise your change ideas if you don’t have access to QIDS.
How do you test change ideas through PDSA cycles?
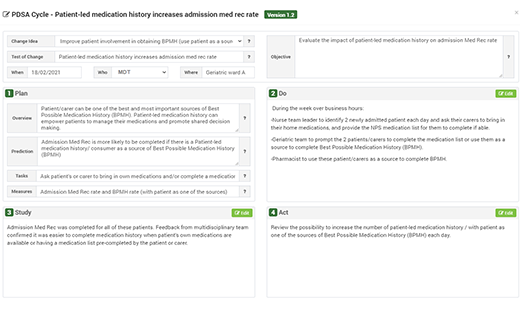
To determine if the change ideas lead to an improvement, they each need to be tested on a small-scale using Plan, Do, Study, Act (PDSA) cycles.
PDSA cycles are designed to be performed rapidly and sequentially. Implementation of a change - which takes substantial time and effort - only occurs if the testing of the change (which starts small and gradually increases) achieves a reliable improvement. You must work through each of the four stages of a PDSA cycle:
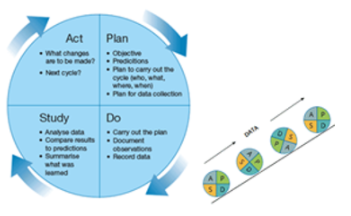
- Plan – the change (who, what, when, where and how) and make predictions about the outcome.
- Do – carry out the plan, observe and measure (that is, collect data) what happens. Take notes of what went well and what didn’t.
- Study – analyse and compare data, summarise learnings.
- Act – decide on what will be abandoned, modified or tested in a larger way for the next PDSA test using the results from the study phase.
PDSA cycle tests start on a very small scale (for example, testing a change on one patient or one shift or with one team) so you can test safely. If the first test leads to the predicted effect, the next test can be slightly larger (for example, testing on three patients, three shifts or three teams) and once there is more data and confidence in the change, the test size can be increased again (for example, to five units).
Once you have the data and confidence from these tests, the change can be rolled out and reviewed until the team can see a reliable improvement. The benefit of this is if the change doesn't achieve the desired or expected results, you can quickly move on without having spent a huge amount of time on it or implemented it broadly.
Visit the CEC QI Academy website on PDSA cycles.
NOTE: If you have started to think about PDSA cycles, it is a good idea to think about how you will measure your changes at the same time. Visit the Data for improvement toolkit page for more information.
Start on a very small scale (one patient, one day, one team) so the project team can test safely, learn as the test sizes increases (three then seven then all) and ultimately show a reliable improvement captured via the measures.
Here are some tips on conducting PDSA cycles:
- Test no more than three change ideas at a time
- Consider testing the next change idea when the project team is confident in the first change idea (that is, starting to scale up the testing)
- Not designed to be time consuming and can be performed rapidly and in a staggered approach
- Monitor the data and measures to track improvements
- Determine which changes (or combination of change ideas) are leading to an improvement and achieving the project aim.